If you’ve ever stood in front of a wall of makeup brushes wondering which ones you actually need, you’re not alone. Makeup brushes can feel like a mystery—there are so many shapes, sizes, and types that it’s hard to know where to start. But here’s the thing: the right brush really does make a difference. It’s not about having the fanciest tools or the biggest collection. It’s about understanding what each brush does and how to use it properly.
A good brush helps foundation look smooth instead of streaky. It makes eyeshadow blend seamlessly instead of sitting in patches. It turns blush application from guesswork into something you can actually control. When you know which brush to reach for and how to work with it, your entire makeup routine becomes easier and more enjoyable.
In this guide, we’ll break down the most common types of makeup brushes in plain language. You’ll learn what each one is designed to do, which products work best with it, and the techniques that actually matter. No complicated jargon, no overwhelming lists of things you don’t need. Just practical information to help you build a collection that works for you and use it with confidence. By the end, you’ll know exactly which brushes deserve a spot in your routine and how to get the most out of them.
- What Are the Main Types of Makeup Brushes?
- Face Makeup Brushes
- Foundation Brushes
- Powder Brushes
- Blush Brushes
- Contour & Bronzer Brushes
- Highlighter Brushes
- Eye Makeup Brushes
- Blending Brushes
- Shader Brushes
- Pencil Brushes
- Smudge Brushes
- Brow Brushes
- Eyeliner Brushes
- Synthetic vs Natural Makeup Brushes: What’s the Difference?
- Why Synthetic Works Better for Creams
- Why Natural Works Better for Powders
- WhichMakeup Brushes Should You Choose?
- How to Choose the Right Makeup Brush
- Consider the Brush Shape
- Evaluate Bristle Density
- Check the Bristle Length
- Match to Your Makeup Type
- Think About Your Technique
- Start with the Essentials
- How to Use Each Type of Makeup Brush Correctly
- How Much Product to Pick Up
- Matching Brush Texture to Product Formula
- Common Application Mistakes
- Avoiding Patchiness and Uneven Color
- Controlling Pressure and Blending Technique
- The Universal Technique
- Conclusion
What Are the Main Types of Makeup Brushes?
Makeup brushes are specifically designed tools that help you apply, blend, and distribute cosmetic products with precision and control. Unlike using your fingers or sponges, brushes offer varied textures, densities, and shapes that work with different product formulas—from liquid foundation to powder eyeshadow.
The shape of a brush directly impacts how product is deposited and blended onto your skin. A flat, dense brush packs on pigment for full coverage, while a fluffy, tapered brush diffuses color for a soft, natural finish. Understanding these differences helps you choose the right tool for each step of your makeup routine, ensuring smoother application, better blending, and a more polished final look.
Face Makeup Brushes
Face brushes are the foundation of any makeup collection—they’re designed to cover larger surface areas and create a smooth, even base. These brushes vary significantly in size, density, and shape to accommodate different product textures and application techniques. Whether you’re building coverage with foundation, setting your makeup with powder, or adding dimension with contour and blush, the right face brush ensures seamless blending and a natural, airbrushed finish. Investing in quality face brushes makes the difference between makeup that looks cakey or streaky and a flawless, skin-like result.
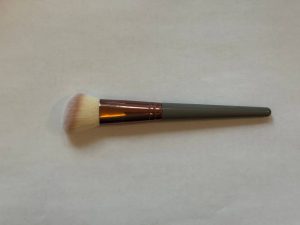
Foundation Brushes
Round Dense Foundation Brush
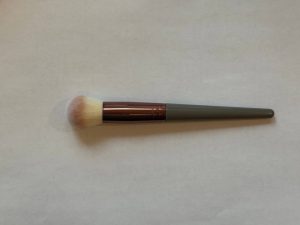
- Shape: Dense, dome-shaped brush with tightly packed bristles
- Best for: Full, controlled coverage; evening out skin tone in targeted areas
- Products: Works with cream and liquid foundations, concealers, and cream contour products
- How to use: Apply product with dabbing motions, then blend using circular or stippling movements for streak-free, even coverage
Powder Brushes
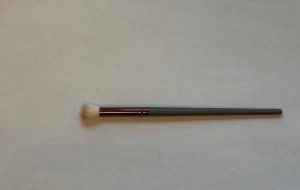
Fluffy Powder Brush
- Shape: Large, round, and extremely soft with loosely packed bristles
- Best for: Even powder distribution with light, invisible coverage; setting makeup without heaviness
- Products: Loose and pressed powder; can also be used for light bronzer application on large face areas
- How to use: Tap off excess product and sweep across face with broad, soft strokes. For more intense setting, gently press the brush into skin
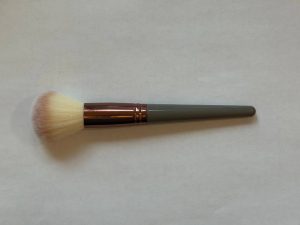
Blush Brushes
Domed Blush Brush
- Shape: Rounded, dome-shaped with soft, fluffy bristles
- Best for: Soft, even blush application; smooth blending without patchiness
- Products: Powder blush, light bronzers, and finishing powders with color
- How to use: Pick up small amount of product and apply in circular motions to the apples of cheeks, extending toward temples. Lighten pressure when blending for a natural effect
Contour & Bronzer Brushes
Angled Contour Brush
- Shape: Flat, angled edge with medium density
- Best for: Creating defined, controlled shadow; precisely sculpting cheekbones and face shape without harsh lines
- Products: Dry contour products, bronzers, and blush. Can work with light cream textures when applied minimally
- How to use: Place brush edge under cheekbones and sweep toward temples with gentle strokes. Use the wider side to soften and blend edges
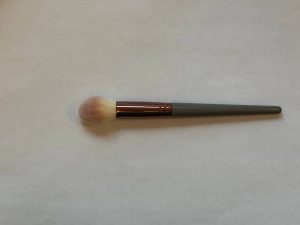
Highlighter Brushes
Fan Highlighter Brush
- Shape: Thin, spread-out bristles in a fan formation
- Best for: Applying a light, luminous glow in thin layers; delicately highlighting prominent face areas
- Products: Powder highlighters, shimmer powders, and soft loose textures
- How to use: Pick up minimal product and sweep across tops of cheekbones, bridge of nose, or above cupid’s bow. For softer effect, gently shake brush before applying
Eye Makeup Brushes
Eye brushes are precision tools designed for detailed, intricate work on one of the most delicate areas of the face. The shape, density, and bristle length of each brush directly affect how color is deposited, blended, and diffused across the eyelid. A fluffy, loosely packed brush creates soft, seamless transitions in the crease, while a flat, dense brush packs on intense pigment for maximum color payoff. Shorter bristles offer more control for precise placement, while longer bristles allow for sweeping, diffused effects. Understanding these differences helps you create everything from subtle, everyday looks to dramatic, editorial eye makeup with professional precision
Blending Brushes
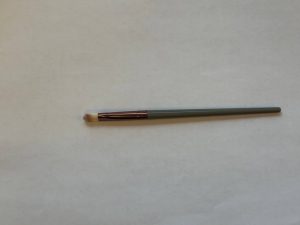
Small Fluffy Blending Brush
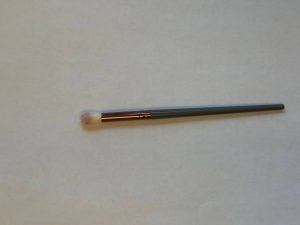
- Shape: Small, round, and loosely packed with soft bristles
- Best for: Blending eyeshadow in the crease, softening harsh edges, creating smooth color transitions
- Products: Powder eyeshadows, pigments, and light matte shades. Can also be used for delicate highlighter application in the inner corner
- How to use: Pick up minimal product and work with light circular and back-and-forth motions in the crease. Hold the brush closer to the end of the handle for softer blending
Angled Crease Brush
- Shape: Medium-sized with an angled, tapered edge
- Best for: Precisely placing shadow in the crease while simultaneously extending color toward the outer corner for defined eye shape
- Products: Powder matte eyeshadows, satin finishes, and transition shades
- How to use: Place the angled side into the crease and move with smooth back-and-forth motions. For elongated eye shape, direct the brush from crease to temple with light strokes
Shader Brushes
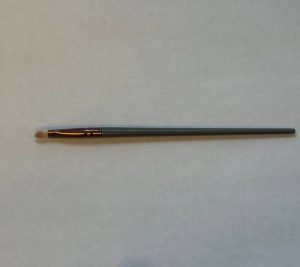
Flat Eyeshadow Brush
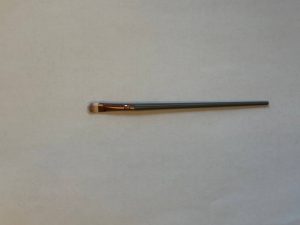
- Shape: Flat, dense brush with tightly packed bristles
- Best for: Densely transferring color onto the lid; creating saturated coverage without fallout
- Products: Powder eyeshadows, shimmers, and metallics. Can also be used with cream shadows when product is picked up carefully
- How to use: Pick up shadow with the flat side and transfer to lid using patting motions. For softer edges, lightly sweep a clean brush along the color border
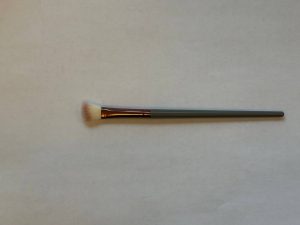
Flat-Fluffy Eyeshadow Brush
- Shape: Medium-sized, slightly domed with moderate density
- Best for: Applying eyeshadow to the mobile lid and gently blending the edges simultaneously, creating denser color saturation at the base
- Products: Powder eyeshadows, satin and matte finishes. Can be used for light darkening of the outer corner
- How to use: Pick up shadow with the flat side and pat onto lid. After application, transition to light blending motions along the color edge
Small Detail Shadow Brush
- Shape: Small, flat, and dense with a precise tip
- Best for: Applying color to small areas precisely: inner corner, lower lash line, and light accent zones
- Products: Powder eyeshadows, shimmers, pigments, and dense matte shades. Can be used for precise application of cream products
- How to use: Pick up minimal product and apply with short pressing motions. For a soft effect, lightly sweep along the edge with a clean brush
Pencil Brushes
Small Pencil Brush for Spot Blending
- Shape: Small, tapered, pencil-shaped with a pointed tip
- Best for: Precisely placing accents and working small areas: lower lash line, outer corner, crease for targeted darkening
- Products: Powder eyeshadows, dense matte shades, and soft pencil lines that need blending
- How to use: Pick up minimal product and work with short, precise motions along the lash line or in eye corners. To soften edges, go over applied color with a clean pencil brush
Smudge Brushes
Small Flat Detail Brush
- Shape: Small, flat, and dense with a precise edge
- Best for: Applying color precisely and clearly working small zones: lower lash line, outer corner, eyeliner border
- Products: Powder eyeshadows, dense matte shades, and cream products with minimal pickup
- How to use: Work with short pressing motions along the lash line or in eye corners. To soften the line, lightly sweep the brush over applied color
Brow Brushes
Dual-Ended Brow Brush (Angled Brush + Spoolie)
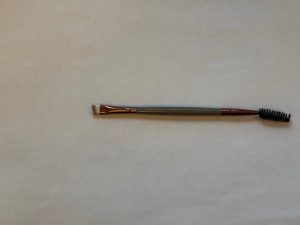
- Shape: One end features an angled, flat brush; the other has a spiral bristle brush (spoolie)
- Best for: Clearly defining brow shape, filling in gaps, and brushing hairs in the desired direction
- Products: Brow shadows and pomades, pencil lines for blending, and setting gels (with spoolie)
- How to use: Use the angled side to apply product with short strokes following hair growth, creating the brow line. Use the spoolie to brush brows, distribute color, and soften edges
Dual-Sided Lash & Brow Comb
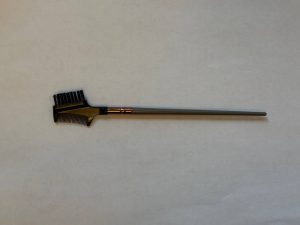
- Shape: One side features a fine-tooth comb; the other has stiff bristles
- Best for: Combing and separating lashes to remove excess mascara; grooming brows and softening lines after filling
- Products: Used without cosmetics or in combination with mascara and brow products for distribution and neat grooming
- How to use: Use the comb side to separate lashes after mascara application. Use the stiff brush to comb brows upward and into shape, distributing product and removing excess
Eyeliner Brushes
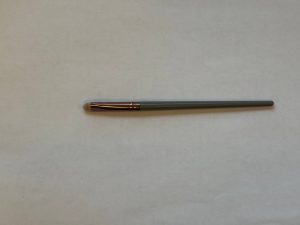
Micro Detail Brush
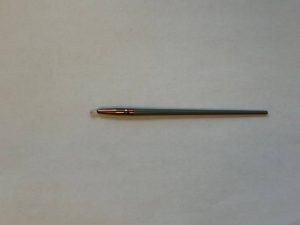
- Shape: Extremely small, thin, and precise with a pointed or flat tip
- Best for: Working the tiniest areas: precise accents, inner corner, fine lines, and small highlight zones
- Products: Powder eyeshadows, pigments, highlighter for mini-accents, and cream products with careful pickup
- How to use: Pick up minimal product and apply with precise pressing motions. For a seamless transition, lightly blend the edge with a clean brush
Synthetic vs Natural Makeup Brushes: What’s the Difference?
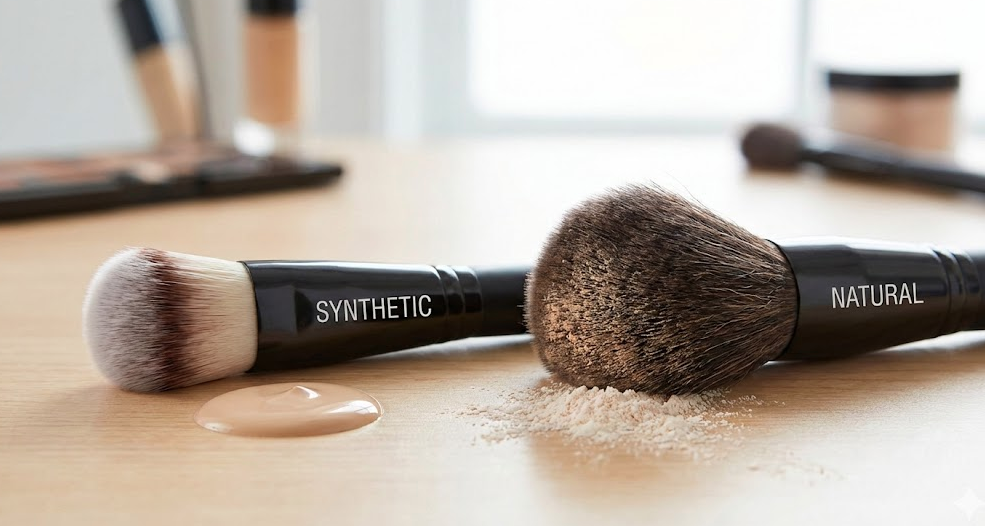
The type of bristles in your makeup brushes—synthetic or natural—plays a crucial role in how products apply and blend on your skin. Understanding the difference helps you choose the right brush for each product formula and achieve better results.
| Feature | Synthetic Brushes | Natural Brushes |
|---|---|---|
| Material | Man-made fibers (nylon, taklon) | Animal hair (goat, squirrel, pony, sable) |
| Texture | Smooth, non-porous surface | Porous, textured with tiny scales |
| Best For | Cream and liquid products | Powder products |
| Ideal Products | Liquid foundation, cream concealer, cream blush, liquid highlighter, cream contour | Powder foundation, setting powder, blush, bronzer, eyeshadow, contour powder |
| How They Work | Don’t absorb product—more formula stays on skin rather than trapped in bristles | Grab and hold powder particles for smooth, even distribution |
| Application | Precise, controlled coverage | Soft, diffused, airbrushed finish |
| Maintenance | Easy to clean, dry quickly | Require gentle cleaning, longer drying time |
| Durability | Maintain shape well when wet | Can lose shape if not cared for properly |
| Feel | Slightly firmer, less fluffy | Ultra-soft, luxurious, fluffy |
| Price | Generally more affordable | Often more expensive |
| Ethics | Cruelty-free, vegan-friendly | Not cruelty-free (animal-derived) |
Why Synthetic Works Better for Creams
Synthetic bristles have a smooth, non-porous surface that doesn’t absorb liquid or cream products. According to beauty experts at L’Oréal Paris, this non-absorbent quality ensures more product transfers onto your skin rather than getting soaked into the brush. The firm, resilient fibers also maintain their shape when working with wet formulas, preventing the brush from becoming floppy or losing precision during application.
Why Natural Works Better for Powders
Natural bristles have a porous structure with microscopic scales that act like tiny hooks, grabbing powder particles and distributing them evenly across the skin. This creates a soft, diffused application that builds gradually without looking patchy or heavy. The natural texture also allows for seamless blending, giving that coveted airbrushed finish.
Which Makeup Brushes Should You Choose?
The simple rule: match the brush type to your product texture. Use synthetic brushes for anything liquid or cream-based, and natural brushes for powder products. Many professional makeup artists keep both types in their collections to work with different formulas effectively.
If you’re building a starter collection or prefer cruelty-free options, high-quality synthetic brushes can work well across most products—modern synthetic fibers have improved dramatically and can now handle both cream and powder formulas with decent results, though specialized brushes still perform best.
How to Choose the Right Makeup Brush
Choosing the right makeup brush doesn’t have to be overwhelming. Focus on a few key factors to find brushes that work for your needs and skill level.
Consider the Brush Shape
The shape determines where and how the product is applied. Flat brushes pack on color densely and work best for precise placement, while rounded or domed brushes diffuse product softly for natural, blended effects. Angled brushes follow facial contours and create definition in specific areas, and tapered brushes offer precision at the tip with blending capability along the sides.
Evaluate Bristle Density
Density affects coverage and intensity. Dense, tightly packed bristles deliver full coverage with controlled application and intense color payoff. Loose, fluffy bristles create sheer coverage with diffused application and soft, buildable color. Match density to your desired finish: choose dense for bold looks and fluffy for subtle effects.
Check the Bristle Length
Length impacts control and blending. Short bristles give you maximum control and precise placement, making them ideal for detailed work. Long bristles allow for sweeping motions and diffused blending, perfect for covering large areas. Shorter brushes work best for targeted application, while longer brushes create seamless transitions.
Match to Your Makeup Type
Your product formula should guide your choice. Liquid and cream products work best with synthetic brushes because they’re non-absorbent and easy to clean. Powder products perform better with natural or high-quality synthetic brushes that can grab and distribute pigment evenly across the skin.
Think About Your Technique
Choose brushes that support your application style. Beginners should start with fluffy, forgiving brushes that blend mistakes easily. If you love precision work, opt for smaller, denser brushes with defined edges. Those who apply makeup quickly will appreciate large, multi-purpose brushes that cover more area in less time. Detail-oriented makeup lovers should invest in small, precise brushes for intricate work.
Start with the Essentials
You don’t need every brush available. Build your collection around the basics: a foundation brush (flat or buffing), a large fluffy powder brush, a domed or angled blush brush, a small fluffy blending brush for eyes, and a flat eyeshadow brush for lid color. As you refine your technique and experiment with different looks, add specialized brushes that fill specific gaps in your routine.
How to Use Each Type of Makeup Brush Correctly
Mastering makeup brushes isn’t just about owning the right tools—it’s about understanding how to work with them. These universal principles apply across all brush types and will help you avoid common mistakes while achieving professional-looking results.
How Much Product to Pick Up
The biggest mistake beginners make is overloading their brushes. More product doesn’t mean better application—it often leads to patchiness, harsh lines, and difficulty blending. Start with less than you think you need. You can always build up coverage gradually, but removing excess product from your skin is much harder. For powder products, swirl your brush lightly in the pan, then tap off the excess before applying to your face. With liquid or cream formulas, dot the product directly onto your skin first, then use the brush to blend and distribute rather than picking up product with the brush itself.
Matching Brush Texture to Product Formula
The golden rule is simple: smooth products need smooth brushes, and textured products need textured bristles. Liquid and cream formulas glide best with synthetic brushes because the non-porous fibers don’t absorb moisture, keeping the product on your skin where it belongs. Powder formulas need brushes with some texture—either natural bristles or quality synthetic alternatives—because the slightly rougher surface grabs powder particles and releases them evenly. Using the wrong brush type won’t ruin your makeup, but it makes application harder and wastes product.
Common Application Mistakes
Pressing too hard is one of the most frequent errors, especially with face brushes. Heavy pressure disrupts your base makeup, creates streaks, and can irritate skin. Instead, let the brush do the work with its natural weight and shape. Another common mistake is using back-and-forth dragging motions, which push product around rather than blending it in. This creates visible brush strokes and uneven coverage. Lastly, many people work too quickly without giving each layer time to settle, leading to a muddy, overworked appearance.
Avoiding Patchiness and Uneven Color
Patchy application usually comes from three issues: too much product at once, uneven distribution, or skipping the blending step. To prevent this, always start with a light hand and build gradually. Use gentle circular or sweeping motions to distribute color evenly before it sets on the skin. Pay special attention to edges and borders—this is where patchiness becomes most visible. If you notice uneven areas, don’t add more product immediately. Instead, use a clean, fluffy brush to blend and diffuse what’s already there. Sometimes all you need is better blending, not more makeup.
Controlling Pressure and Blending Technique
The amount of pressure you apply changes everything about how makeup looks on your skin. Light, feathery pressure creates soft, diffused effects perfect for blush, bronzer, and eyeshadow blending. Moderate pressure works for foundation and concealer application where you want coverage but still need to blend seamlessly. Firm pressure should be reserved only for packing on intense color, like when you’re applying eyeshadow to the lid or want maximum pigment payoff.
For blending, think in layers rather than one heavy application. Apply your product, then switch to a clean blending brush and work the edges in small circular motions until you can’t see where the color starts and stops. The key is patience—good blending takes time. If you’re struggling to blend, it often means you’ve applied too much product or you’re pressing too hard. Lighten your touch, use a clean brush, and work in small sections rather than trying to blend everything at once.
The Universal Technique
Regardless of which brush you’re using, this approach works every time: pick up a small amount of product, tap or swirl off the excess, apply to skin with appropriate pressure for the area, and blend the edges immediately before the product sets. This simple sequence prevents most common makeup mishaps and gives you more control over the final result. With practice, these movements become second nature, and you’ll instinctively know how much product to use and how much pressure to apply for each step of your routine.
Conclusion
Understanding makeup brushes transforms them from confusing tools into reliable partners in your beauty routine. The key takeaway is simple: the right brush makes every product perform better and every technique easier to master. Shape, density, and bristle type aren’t just technical details—they directly determine whether your foundation looks airbrushed or streaky, whether your eyeshadow blends seamlessly or sits in patches, and whether your entire look appears polished or unfinished.
You don’t need dozens of brushes to create beautiful makeup. Start with a few versatile essentials that match your most-used products, and build from there as your skills and preferences develop. Remember to match synthetic brushes with cream and liquid formulas, and use natural or quality synthetic brushes for powders. Most importantly, focus on technique over tools—even the most expensive brush won’t fix heavy-handed application or skipped blending.
If you want to dive deeper into mastering makeup application and understanding every brush in detail, our Pro Makeup for Teens course offers comprehensive training. We break down each brush type step-by-step, demonstrate proper techniques, and give you hands-on practice with professional guidance. You’ll learn not just which brushes to use, but how to use them like a pro to create any look you envision.
As you practice with different brushes, you’ll develop an intuitive sense of which tool to reach for and how to use it. The brushes that feel awkward now will become natural extensions of your hand. With this knowledge, the right tools, and continued practice, you have everything you need to elevate your makeup application and achieve the professional results you’ve been looking for.